
Job Site Photo Documentation Workflow: 2026 Best Practices
Optimize your job site photo documentation workflow to enhance project outcomes, prevent disputes, and ensure real-time visibility. Learn best practices...
Why Your Photo Documentation Workflow Determines Project Outcomes
A job site photo documentation workflow is the structured process of capturing, organizing, and managing visual records at every phase of a construction or roofing project. Done right, it prevents disputes, supports payment approvals, and gives your office real-time visibility without a site visit. Done wrong, or not at all, it leaves you defending work you can no longer prove was done correctly.
The stakes are concrete. Inefficient photo documentation causes costly construction disputes that inflate project durations and budgets. Most of those disputes are preventable with a system that captures the right images, tags them properly, and makes them retrievable in seconds.
Here is what a functional workflow covers:
- Systematic capture: Phase-specific shot lists tied to project milestones, not random photos taken when someone remembers
- Metadata integrity: Timestamps and GPS coordinates embedded at capture, not added later
- Centralized storage: Cloud-based repository accessible to field and office simultaneously
- Organized retrieval: Tags by project, phase, trade, and status so any photo surfaces in under a minute
- Legal defensibility: Contemporaneous, location-verified images that hold up in audits, insurance claims, and disputes
The contractors who never lose disputes follow this structure. The ones who do lose them usually had photos somewhere, just not organized, tagged, or captured at the right moment.
Phase-by-Phase Photo Documentation Guide for Construction and Roofing Projects
Random photos of a site are not documentation. A complete visual record requires specific content at specific stages. For commercial roofing and general construction, three phases define the minimum viable capture protocol.
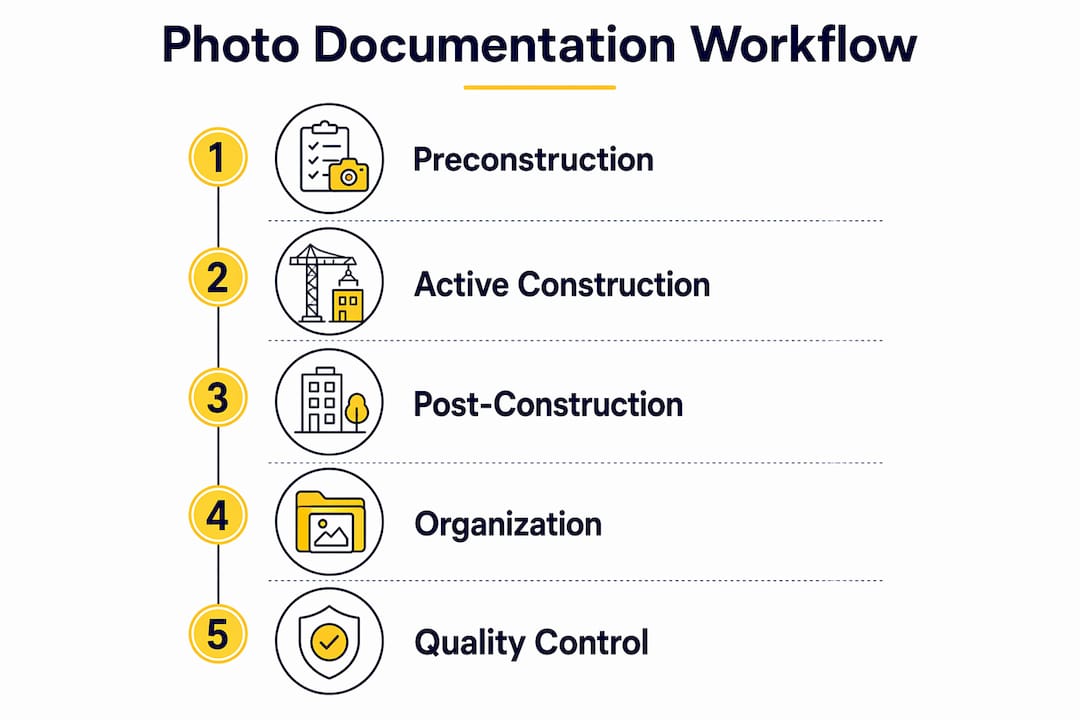
Phase 1: Preconstruction
This is your baseline, and you only get one shot at it. Before your crew touches anything, document the entire site in a consistent pattern. Assign one person to walk the property methodically, not randomly.
Required preconstruction photos:
- Wide-angle overviews of the full site, including boundaries and access routes
- Existing surface conditions: pavement, concrete, drainage patterns, standing water
- Adjacent property conditions, including neighboring foundations, driveways, and any visible prior damage
- Utility markings, access points, and site signage
- Existing damage to any structure your crew will work near or on
Store everything under a clearly labeled “Pre-Construction Conditions” folder. These images are your legal baseline if any neighbor or owner later claims your crew caused damage that was already there.
Phase 2: Active Construction
This phase carries the highest documentation risk because critical work gets covered up. Pre-concealment photos of hidden systems such as insulation, plumbing, and MEP rough-ins must be mandatory for project acceptance. Once drywall or roofing membrane goes over it, you cannot prove what is underneath without tearing it back open.
Required active construction photos:
- Foundations and under-slab work (plumbing, electrical, rebar) before concrete pours
- In-wall MEP rough-ins and structural framing before insulation and drywall
- Waterproofing, weather barriers, and flashing installation
- Daily progress shots from consistent angles and positions
- Weather events affecting production
- Material deliveries with visible product labels when selection could be disputed
- Any deficient work by another trade before it is repaired or covered
For roofing specifically, every penetration boot, ridge detail, and flashing termination deserves a close-up before the next layer goes down.
Phase 3: Post-Construction Closeout
Final photos should mirror your preconstruction angles. That parallel structure makes before-and-after comparison straightforward for adjusters, owners, and attorneys.
Pro Tip: Use the wide-medium-close sequence for every critical installation: wide shot to show location context, medium shot to show the assembly, close-up to capture the fastener, joint, or label that matters. Three shots per critical item takes 60 seconds and eliminates ambiguity.
Best Practices for Organizing and Managing Job Site Photos Efficiently
Taking photos is step one. Being able to retrieve them months later when a dispute surfaces is what actually protects you. Contractors relying on personal camera rolls risk losing critical evidence. A photo buried in a text thread or personal gallery has no business value when you need it under pressure.
The fix is a consistent organizational structure applied from day one, not retrofitted after the project ends.
Recommended folder and naming structure:
- Top level: Project name or number
- Second level: Phase (preconstruction, foundation, framing, MEP, roofing, closeout)
- Third level: Trade or area if needed
- File naming format:
ProjectName_YYYY-MM-DD_Trade_Subject_001.jpg
A file named IMG_4739.jpg tells you nothing. A file named Riverside-Office_2026-03-14_Roofing_FlashingNorthEave_001.jpg is searchable, sortable, and self-explanatory two years later.
Photos organized by project, phase, trade, and status tags enable rapid retrieval and audit readiness. Most field platforms let you apply these tags at capture, which means the organizational work happens in the field, not at the office desk.
Do’s for photo organization:
- Use cloud-based storage with automatic backup and access controls
- Apply tags at capture: location, trade, phase, status, and any linked RFI or change order
- Assign one person per zone to review daily uploads and flag gaps
- Create separate views or albums for owner updates, pay applications, QA, and disputes
Don’ts:
- Store photos in personal camera rolls, text threads, or email attachments
- Use generic shared drives without a tag structure, where search depends on folder memory
- Rename files after the fact, which breaks the metadata chain
- Allow photos to accumulate for weeks before organizing them
Poor photo management creates the same operational problems as poor work order management: delays, cost overruns, and disputes that could have been avoided. Integrating your photo system with your field reporting tools keeps the transition from field to office automatic rather than manual.
Using Job Site Photos for Quality Control, Dispute Mitigation, and Project Efficiency
Photos tied to project milestones do more than document work. They verify compliance, support payment approvals, and give project managers a way to catch deficiencies before they become expensive corrections.
The most direct application is pre-concealment verification. When a photo of in-wall electrical conduit or under-slab plumbing is captured before cover-up, it creates an irrefutable record of what was installed and how. If a question arises six months later, the answer is already in the archive. Without that photo, the answer requires opening the wall.
Photo documentation mapped to payment milestones speeds cash flow by providing proof of completed work per specifications. Owners and GCs approve faster when the evidence is organized and timestamped rather than described verbally.
Practical applications for quality control and dispute mitigation:
- Use daily progress photos tied to daily reports to confirm manpower, equipment, and work completed
- Require photos before any deficient work by a subcontractor is repaired or covered, then send written notice to the responsible party
- Review photos weekly against the work completed to catch missing documentation while site memory is fresh
- Create milestone photo packages for pay application submissions, showing completed scope at each billing event
- Use before-and-after pairs for change order work to eliminate scope disputes
Weekly internal photo reviews keep projects accountable and prevent documentation gaps while the team can still fill them. A gap found on Friday is fixable. A gap found during litigation is not.
The other underused application is remote project oversight. When photos are captured from standardized angles at fixed site positions, a project manager can track progress without a site visit. That is not a convenience feature. On a multi-site roofing operation, it is the difference between managing three jobs and managing ten.
Research-Backed Insights and Expert Recommendations to Optimize Photo Documentation Workflows
Systematic photo documentation significantly cuts rework, administrative costs, and project delays. Poor documentation is linked to most disputes, and the pattern holds across project types and contract structures.
The operational advice from field experts converges on a few non-negotiable practices. First, centralized cloud-based software with auto-tagging and metadata capture is the only approach that ensures photo retrieval and usability at scale. Second, a structured system that automates tagging, routing, and reporting reduces administrative overhead and speeds review processes. Third, legal defensibility requires more than just taking photos at the right time.
What makes a photo legally defensible:
- Contemporaneous capture: taken at the time of the work, not reconstructed afterward
- Location verification: GPS coordinates confirming the photo was taken at the actual job site
- Descriptive captions: linking each image to the relevant activity, inspection, or issue
- Organized storage: tied to the correct project and retrievable without manual hunting
- Regular review cycles: to prevent evidence gaps before they become permanent
Construction law guidance from Miller Nash, a construction law firm, notes that business records are strongest when created by someone with knowledge, near the time of the event, and as part of regular recordkeeping. That standard applies directly to site photos.
Pro Tip: Build a pre-concealment photo gate into your field workflow. No MEP, structural framing, or waterproofing gets covered until the responsible crew lead confirms photos are uploaded and tagged. Treat it the same way you treat a required inspection sign-off.
One technical detail that trips up many teams: EXIF metadata often gets stripped by communication platforms like WhatsApp, Slack, email, and Teams. A photo sent through any of those channels may arrive with no timestamp or GPS data attached. The solution is visible overlays burned directly into the image pixels, showing the date, time, GPS coordinates, and project identifier. Those overlays survive every transfer because they are part of the image itself, not separable metadata.
For roofing contractors managing automated workflows, integrating photo capture into the daily project cycle rather than treating it as a separate task is what drives consistent crew adoption. When documentation is built into the install sequence with clear checkpoints, it happens. When it is a verbal reminder at the morning huddle, it does not.
How to Protect Job Site Photos with Proper Data Security and Privacy Measures
Photo security is not just an IT concern. On a commercial roofing project, your photo archive contains proprietary project details, subcontractor work quality, client property conditions, and potentially sensitive structural information. Losing that archive, or having it accessed by the wrong party, creates both operational and legal exposure.
Core security practices for job site photo storage:
- Use cloud platforms with role-based access controls so stakeholders see only what they need
- Require automatic backup to a company-controlled account, never a personal device or personal cloud account
- Apply encryption at rest and in transit for all stored images
- Audit access logs periodically to confirm only authorized users are viewing or downloading photos
The personal-account problem is one of the most common and most damaging failures in construction photo management. When photos live on a departing site manager’s personal device or personal cloud account, they may be inaccessible to the project team the moment that person leaves. A documentation system where photos upload automatically to a project-level company account eliminates that risk entirely.
Privacy on job sites also requires attention. Post a visible site notice informing workers that photo documentation occurs daily. Avoid close-up identifiable photos of workers’ faces unless a safety incident requires it. For projects subject to builders risk coverage, maintaining a complete and secure photo archive directly supports claims documentation and can affect coverage outcomes.
When sharing photos with owners, GCs, or adjusters, provide organized galleries or structured photo reports rather than scattered attachments. That approach creates a shared reference point and documents that information was delivered, to whom, and when. Good systems track whether recipients opened the shared record, which photos they viewed, and when follow-up is warranted.
Never edit or filter photos used for documentation. An edited photo loses admissibility. Store originals, always.
Terial Keeps Every Job Photo Connected to the Work
Taking the photo is only useful if the right people can find it when they need it. When job site photos live across personal camera rolls, text threads, and shared drives, documentation becomes another manual process for the office to reconstruct.
Terial brings field documentation into the same system contractors use to run the job. Crews can capture photos as part of their daily workflow, tying each image directly to the relevant project, phase, and activity so the office can see what is happening in real time.
That gives roofing contractors:
- One project record for field documentation, instead of photos scattered across devices and communication tools.
- Faster office visibility, because documentation reaches the team as work happens rather than at the end of the week.
- Cleaner closeouts and disputes, with project photos already connected to the work they document.
- Less administrative work, because crews capture information once instead of the office having to organize it later.
With Terial, photo documentation becomes part of running the job, rather than another task teams have to remember after the work is done.
Key Takeaways
A complete job site photo documentation workflow requires phase-specific capture, visible metadata, centralized cloud storage, and weekly review cycles to protect project outcomes and legal standing.
FAQ
What Photos Should Roofing Contractors Take on Every Job?
Roofing contractors should document the project before work begins, throughout installation, and at closeout. That includes existing conditions, daily progress, material deliveries, flashing and penetration details before they are covered, any deficient work or scope changes, and final completion photos.
How Should Job Site Photos Be Organized?
Photos should be stored in a centralized, company-controlled system and organized by project, phase, trade, and status. Applying timestamps, GPS data, and descriptive tags when the photo is captured makes records easier to retrieve later for quality reviews, payment applications, warranty claims, or disputes.
Why Are Pre-Concealment Photos Important in Roofing?
Pre-concealment photos document work that will become impossible to inspect once the next roofing layer is installed. Capturing flashings, penetrations, waterproofing, and other critical details before they are covered creates a permanent record of how the work was completed.
How Can Job Site Photos Help Roofing Contractors Get Paid Faster?
Photos tied to project milestones give owners and general contractors clear evidence that contracted work has been completed. Organized, timestamped photo packages can support pay applications, reduce questions about completed scope, and help approvals move faster.
Recommended





Book a personalized demo
Get a 30-minute demo tailored to how you run your commercial roofing business

“Making the switch to Terial has greatly exceeded my expectations and has already had a meaningful impact on our team’s productivity. Terial has significantly reduced the amount of time required to complete many of our day-to-day operational tasks, allowing our team to focus more on serving our customers.”

